
Sunday, December 21, 2008
Saturday, September 13, 2008
To make Windows XP shutdown faster
You can make your shut down process a bit faster by the following tweak.
Steps: (download the registry file)
1. This step is very important.
Export (right click > Export) the following keys and save it to a safer place.
HKEY CURRENT USER\Control Panel\Desktop
HKEY_LOCAL_MACHINE\SYSTEM\CurrentControlSet\Control
2. Open Notepad, copy and paste the following to the Notepad.
Windows Registry Editor Version 5.00
[HKEY_CURRENT_USER\Control Panel\Desktop]
"AutoEndTasks"="1"
"HungAppTimeout"="1000"
"WaitToKillAppTimeout"="2000"
[HKEY_LOCAL_MACHINE\SYSTEM\CurrentControlSet\Control]
"WaitToKillServiceTimeout"="2000"
3. Save the file and close Notepad.
4. Change extension of the file from .txt (text file) to .reg (registry file).
5. Double click open this file and click Yes and the OK
Command prompt disabled
Use this method to enable the Command Prompt.
There are three methods: (Or download file from bottom)
Method 1: (Run method)
1. Select Run from Start menu.
2. Type the following: (better copy and paste)
REG add HKCU\Software\Policies\Microsoft\Windows\System /v DisableCMD /t REG_DWORD /d 0 /f
and press Enter.(Click OK)
Method 2: (Registry Editor method)
1. Open Registry Editor.
2. Get to this key:
HKEY_CURRENT_USER\Software\Policies\Microsoft\Windows\System
3. In the right pane, double click on DisableCMD and set it's data to 0.
4. Close Registry Editor.
Method 3: (Group Policy method)
1. From Start menu, select Run. Type gpedit.msc and press Enter.
Group Policy editor opens.
2. Get to:
User Configuration > Administrative Templates > System
3. From the right pane, double click open Prevent access to the command prompt.
4. Set Disable and click OK.
5. Exit Group Policy editor.
Download files:
1. CMD- enable. (.rar file, extract to get .reg file)
Change Start Menu display name
You can change the display name from Start to any other, of the Start menu.(In Windows XP only)
This work is Not Recommended, no responsibility will be paid. But will certainly give help to restore if you got wrong.
Warning: Make sure that Task Manger is not Disabled.
You must download this file to start the steps.
1. Resource Hacker
(If the link is broken or file not found, please leave a comment aboout that. I will replace the with a working link)
Extract the downloaded file and install the software.
Now follow this steps:
Stage 1: (creating copy of explorer.exe for editing)
1. From the Start menu, select Run.
Type the following: (Better copy and paste)
xcopy c:\windows\explorer.exe c:\explorer_edit\explorer.exe
where C: is your windows drive.
Press F to confirm.
this makes a copy of file c:\explorer.exe in the folder c:\explorer_edit\
Stage 2: (editing copied explorer.exe to rename start)
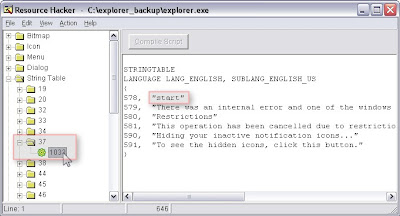
1. Start Resource Hacker Software, that you installed.
2. In the program window, select Open from File menu.
Open the file c:\explorer_edit\explorer.exe
3. Now, a branch appears in the left pane.
Double click on String Table to open that branch.
4. If you are using Windows XP visual style, double click on 37 and click 1033.
If you are using Windows Classic Layout, double click on 38 and click on 1033.
 click on picture to enlarge
5. In the right pane, you can see a string "start"
Change the name start to the word you want. For example: "name" (do not make a long name).
6. Click on Compile Script. Then select Save from Files menu.
7. Close the program.
Stage 3: (modifying registry to start edited explorer.exe on booting)
1. Start the Registry Editor. (Start > Run > regedit)
2. Get to this key:
This work is Not Recommended, no responsibility will be paid. But will certainly give help to restore if you got wrong.
Warning: Make sure that Task Manger is not Disabled.
You must download this file to start the steps.
1. Resource Hacker
(If the link is broken or file not found, please leave a comment aboout that. I will replace the with a working link)
Extract the downloaded file and install the software.
Now follow this steps:
Stage 1: (creating copy of explorer.exe for editing)
1. From the Start menu, select Run.
Type the following: (Better copy and paste)
xcopy c:\windows\explorer.exe c:\explorer_edit\explorer.exe
where C: is your windows drive.
Press F to confirm.
this makes a copy of file c:\explorer.exe in the folder c:\explorer_edit\
Stage 2: (editing copied explorer.exe to rename start)
1. Start Resource Hacker Software, that you installed.
2. In the program window, select Open from File menu.
Open the file c:\explorer_edit\explorer.exe
3. Now, a branch appears in the left pane.
Double click on String Table to open that branch.
4. If you are using Windows XP visual style, double click on 37 and click 1033.
If you are using Windows Classic Layout, double click on 38 and click on 1033.
 click on picture to enlarge
5. In the right pane, you can see a string "start"
Change the name start to the word you want. For example: "name" (do not make a long name).
6. Click on Compile Script. Then select Save from Files menu.
7. Close the program.
Stage 3: (modifying registry to start edited explorer.exe on booting)
1. Start the Registry Editor. (Start > Run > regedit)
2. Get to this key:
HKEY_LOCAL_MACHINE\SOFTWARE\Microsoft\Windows NT\CurrentVersion\Winlogon
4. In the right pane double click open the entry Shell .
5. Type c:\explorer_edit\explorer.exe and press OK.
6. Close the Registry Editor.
The job is done, now restart the system.
Download Files:
Backup of Winlogon Registry key. (.rar file, extract to get .reg file)
If anything goes wrong, press Ctrl+Alt+Del to open Task Manager .
Go to Process tab, right click on explorer.exe and select End Process Tree.
From the File menu, select New task (Run...).
Type explorer.exe and click OK.
Now, import the registry file that was exported in stage3/step3 or download from the Download files category.
If anything goes wrong, orkut users can click on Submit Query and others on About > Give Feedback and give the details.
Hide the Notification area
The Notification area shows the softwares which are working in background without user interface.
This area shows the notifications from different softwares, used to show the status of that software.
While using Messengers, when we close them, they minimize to the notification area. When the notification area is disabled, we can get back the closed messenger by opening it from the usual location, such as from desktop shortcut, but not from the notification area
Hiding Notification area is Not Recommended. This trick is only for a informational purpose, no responsibility will be paid to the user from the provider.
Steps:
1. Open Registry Editor. ( Start > Run > regedit ) [
2. Get to this key:
[HKEY_CURRENT_USER\Software\Microsoft\Windows\CurrentVersion\Policies\Explorer]
3. In the right pane look for NoTrayItemsDisplay.Double click open that entry and change the value to 1 (one).
Downloadable files:
1. Hide Notification Area (.reg file)
2. Show Notification Area (undo above) (.reg file)
3. VBS File to automate the process (.rar file, extract to get .vbs file)
Directly jump to a Registry Key
This method is used to jump directly to a Registry Key rather than manually finding it.
This method uses a VB Script.
Method:
1. Open Notepad.
2. Copy the following lines to the Notepad.
Set WshShell = CreateObject("WScript.Shell")
Dim MyKey
MyKey = Inputbox("Type the Registry path")
MyKey = "My Computer\" & MyKey
WshShell.RegWrite "HKCU\Software\Microsoft\Windows\CurrentVersion\Applets\Regedit\Lastkey",MyKey,"REG_SZ"
WshShell.Run "regedit", 1,True
Set WshShell = Nothing
3.Save the file. Change the extension from .txt to .vbs .
4. Double click the file and then type the registry path which you need to open.
For Example:
type HKEY_CLASSES_ROOT\CLSID\{69912A20-9BD4-30C4-8CF8-D7046347A218} to get to that key.
Warning: The above method does not help if Registry Editor is already open.Close the Registry Editor and use.
Explorer.exe not found : Error
When you start Windows XP, an error may occur showing "explorer.exe not found".
Windows do not shows any icons or start menu. The screen will be blank
This occurs when, the file explorer.exe in the Windows folder.
You can try these methods to restore the file.
For this, you need the Windows XP installation CD.
Method 1:
1. Insert the Windows XP CD in the drive. (If Autoplay screen comes, close it.)
2. Press Ctrl+Alt+Del to Open Task Manager.
3. From the Files menu, select New Task (Run...).
4. Type sfc /scannow and press Enter. (or click OK)
5. This starts a process which replaces the missed/replaced files with original one.
Method 2:
Follow upto the 3rd step of the above method.
4. Type expand X:\i386\explorer.ex_ C:\WINDOWS\explorer.exe and press Enter.
The file will be replaced with the original one.
Method 3:
If Task Manager is disabled, you can repair Windows XP by this method.
1. Insert the Windows CD in the drive.
2. Restart system, enter into BIOS (press F2 / Del)
3. Change the first Boot device to your CD Drive.
4. Load the CD, and enter the XP installation wizard.
5. Continue to the selection of drive.
6. After selecting the drive of Windows, press R to repair.
Right Clicking disabled
Sometimes, due to some viruses or worms, your system may disable the Right click context menu.
That is, nothing happens when we right click on any place.
Use this steps only after removing all viruses and bugs from your computer.Otherwise, this method may not work.
Steps to resolve:
1. From the Start menu, select Run.
Type gpedit.msc and click OK.
2. Get to this location:
User Configuration > Administrative templates > Windows Components > Windows Explorer
3. In the right pane double click on :
Remove Windows Explorer's default context menu
4. Select Disable and click OK.
Change Default Folder's Paths
By this method, you can change the path of the default folders to any folder that you decide.
Steps:
1. Open Registry Editor. ( Start > Run > Regedit )
2. Get to this location:
HKEY_CURRENT_USER\Software\Microsoft\Windows\CurrentVersion\Explorer\Shell Folders
3. Export the Key Shell Folder.
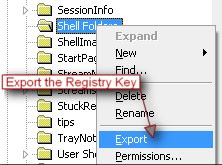
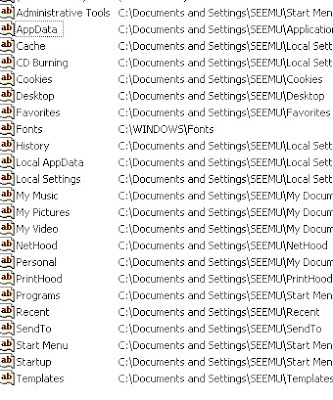
3. Now in right pane, you can see following entries which corresponds to the implied folder (Given below in brown color)
Please do not try the items given in Red color.
Administrative Tools
AppData > Application Data
Cache > Temporary Internet Files
CD Burning > Folder used for storing data for writing to CD.
Cookies
Desktop
Favorites
History
Fonts
Local Application Data
Local Settings
My Music
My Pictures
My Videos
NetHood
My Documents
PrintHood
Programs Files
Recent Documents
Send To
Start Menu
Startup
Templates
Double click the entry for which you want to change the path, and enter the New Path.
Steps:
1. Open Registry Editor. ( Start > Run > Regedit )
2. Get to this location:
HKEY_CURRENT_USER\Software\Microsoft\Windows\CurrentVersion\Explorer\Shell Folders
3. Export the Key Shell Folder.

3. Now in right pane, you can see following entries which corresponds to the implied folder (Given below in brown color)
Please do not try the items given in Red color.
Administrative Tools
AppData > Application Data
Cache > Temporary Internet Files
CD Burning > Folder used for storing data for writing to CD.
Cookies
Desktop
Favorites
History
Fonts
Local Application Data
Local Settings
My Music
My Pictures
My Videos
NetHood
My Documents
PrintHood
Programs Files
Recent Documents
Send To
Start Menu
Startup
Templates
Double click the entry for which you want to change the path, and enter the New Path.

Recycle Bin Customizations
You can add these options to right click menu of Recycle Bin, and do what they means......
Rename - Rename Recycle Bin.
Delete - Delete Recycle Bin icon from desktop.
Warning: Make Backup (export) of the key where we are going to make a change.
How to do:
Start Registry Editor (Start > Run > regedit)
Get to this location:
HKEY_CLASSES_ROOT\CLSID\ {645FF040-5081-101B-9F08-00AA002F954E}\ ShellFolder
(If you cant find manualy, press Ctrl+F and type {645FF040-5081-101B-9F08-00AA002F954E} and press Enter, you will be there)
 Doble click open Attributes,

give the value :50,01,00,20 to get Rename in menu.
give the value :60,01,00,20 to get Delete in menu.
give the value :70,01,00,20 to get Rename and Delete in menu.
Add items to "Send to" menu
You can add your own customized entries in the Send to menu. It comes helpful when you want to copy some data to a specific folder more frequently.
Steps:
1. Copy the folder for which you want an entry in Send to menu.
2. In My Computer, get to this location:
C:\Documents and Settings\User Name\Send to\
where C is the Windows drive and User Name is your User profile name.
(Send to is a hidden folder. Make sure that Show hidden files is selected in the Folder Options> View tab. )
3. In the Send to folder, right click on empty space and select Paste Shortcut.
Now check your Send to menu, you will have your folder there.
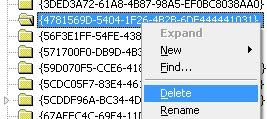
Remove invalid Entries from "Add or Remove Programs"
Sometimes when you remove a program, corresponding entry
in the Add or Remove Programs listing may not be removed. This may be due to incomplete uninstall or bad quality
uninstaller.
You can use this method to manually remove the invalid entries from the Add or
Remove Programs applet.
Safer than using the below method is using the Windows Installer Cleanup Utility.
Steps:
1. Open Registry Editor. (Start > Run > Regedit)
2. Get to this location:
HKEY_LOCAL_MACHINE\SOFTWARE\Microsoft\Windows\CurrentVersion\Uninstall
3. Export (Backup) that key.
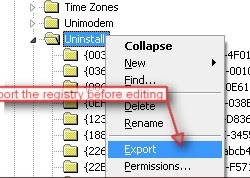
4. Open the tree, you can see many branches. Click on every branch and
see the right pane. You can see the corresponding applications name in
the key DisplayName.

5. If you have the DisplayName value for any branch as the name of the application that you have removed, then delete that key.
Note:If you have accidently deleted any of needed key, you can import it from the file you have exported. Double click on the file and click Yes and then OK.
in the Add or Remove Programs listing may not be removed. This may be due to incomplete uninstall or bad quality
uninstaller.
You can use this method to manually remove the invalid entries from the Add or
Remove Programs applet.
Safer than using the below method is using the Windows Installer Cleanup Utility.
Steps:
1. Open Registry Editor. (Start > Run > Regedit)
2. Get to this location:
HKEY_LOCAL_MACHINE\SOFTWARE\Microsoft\Windows\CurrentVersion\Uninstall
3. Export (Backup) that key.

4. Open the tree, you can see many branches. Click on every branch and
see the right pane. You can see the corresponding applications name in
the key DisplayName.

5. If you have the DisplayName value for any branch as the name of the application that you have removed, then delete that key.

Note:If you have accidently deleted any of needed key, you can import it from the file you have exported. Double click on the file and click Yes and then OK.
Restore "Show Desktop" icon in Quick launch
You may accidentally delete the Show Desktop icon in the quick launch bar.
You can restore it by the following methods.
Method 1:
1. From the Start menu, select Run.
2. Type (or Copy and Paste) the following:
regsvr32 /n /i:U shell32.dll
3. now hit Enter.
Method 2:
1. Open Notepad.
2. Copy and paste the following:
[Shell]
Command=2
IconFile=explorer.exe,3
[Taskbar]
Command=ToggleDesktop
3. Save the file with name Show Desktop. Change the extension from .txt to .scf .
4. Drag this file to the Quick Launch area.
OR
Copy that file to this folder:
%Appdata%\Microsoft\Internet Explorer\Quick Launch (Copy and paste this Run to get to the folder directly)
Turn off Autoplay of CD
You can turn off the Autoplay feature of CD drive by this method.
There are two methods: (only use any one method)
Group Policy method:
1. From the Start menu, select Run . Type gpedit.msc and press Enter.
2. Get to this location:
Computer Configuration > Administrative Templates > System
3. Now, in the right pane double click open Turn off Autoplay. Select Enable and press OK.
To again enable Autoplay, select Disable here.
Registry Editor Method:
1. Open Notepad.
2. Copy and paste the following into it:
Windows Registry Editor Version 5.00
[HKEY_LOCAL_MACHINE\SYSTEM\CurrentControlSet\Services\Cdrom]
"AutoRun"=dword:00000000
3. Save that file and change extension fom .txt to .reg .
4. Double click open that file, click Yes and then OK.
To enable Autoplay again change the last line of the above text to:
"AutoRun"=dword:00000001
Speedup Internet
Registry Trick 1: (or download registry file)
1. Open Notepad.
2. Copy and paste the following text in the Notepad:
Windows Registry Editor Version 5.00
[HKEY_LOCAL_MACHINE\SYSTEM\CurrentControlSet\Services\Tcpip\Parameters]
"SackOpts"=dword:00000001
"TcpWindowSize"=dword:0005ae4c
"Tcp1323Opts"=dword:00000003
"DefaultTTL"=dword:00000040
"EnablePMTUBHDetect"=dword:00000000
"EnablePMTUDiscovery"=dword:00000001
"GlobalMaxTcpWindowSize"=dword:0005ae4c
3. Save the file.
4. Change the file extension from .txt (text file) to .reg (registry file).
5. Double click open the file. Click "Yes" and then "OK".
Registry Trick 2:
1. Open Registry Editor ( Start > Run > regedit )
2. Get to the following key:
HKEY_LOCAL_MACHINE\Software\Microsoft\Windows\CurrentVersion\Explorer\RemoteComputer\NameSpace
Under NameSpace key you can see the below two keys.
{D6277990-4C6A-11CF-8D87-00AA0060F5BF} for Scheduled Tasks.
{2227A280-3AEA-1069-A2DE-08002B30309D} for Shared Printers.
Export (How?) those two keys and then Delete them.
Trick_3:
1. From the Start menu select Run . Type gpedit.msc and hit enter (click Ok).
This opens the Group Policy Editor.
2. Get to:
Local Computer Policy > Computer Configuration > Administrative Templates > Network > QOS Packet Scheduler
3. Then double click LimitReservableBandwidth.
4. Set Enable and give a value 0 (Zero).
This will allow the system to reserve nothing, rather than the default 20%
Snap-in Failed to Initialize: Console
When you try to open a program that involves security policies (such as Local Security Policy, Group Policy, or Domain Security Policy), that may not open, and you may receive an error message similar to the following messages:
Snap-in failed to initialize. Name: Group Policy CLSID: {8FC0B734-A0E1-11D1-A7D3-0000F87571-E3}
or
Snap-in failed to initialize. Name: Resultant Set of Policy CLSID:{6DC3804B-7212-458D-ADB0-9A07E2AE1FA2}
or
Snap-in failed to initialize. Name: Software Installation (Computers) CLSID:{942A8E4F-A261-11D1-A760-00C04FB9603F}
or
Snap-in failed to initialize. Name:
CLSID:{8FC0B734-A0E1-11D1-A7D3-0000F87571E3}
This occurs if the PATH environment variable does not include the %SystemRoot%\System32\WBEM folder.
Steps to resolve:
1. Right-click My Computer, and then click Properties.
2. On the Advanced tab, click Environment Variables.
3. Under System Variables click on the PATH environment variable and click Edit button.
4. Type: (copy and paste)
%SystemRoot%\system32;%SystemRoot%;%SystemRoot%\system32\WBEM
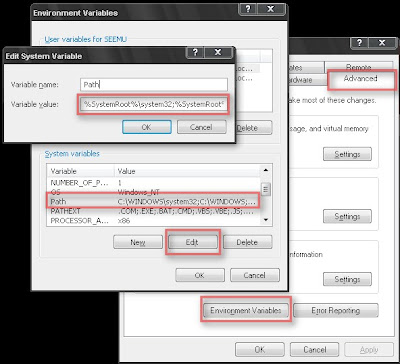
Note: If other system variables appear, do not change/remove them.
5. Click OK, and then click OK.
©Microsoft Help and Support
----------------------------------------------------
If the problem is not the above one, try replacing the gpedit.msc file in system32 folder with its original one from the Windows XP CD.
Steps:
1. Insert the Windows XP CD in the CD Drive.
2. From Start menu, select Run. Type the following and hit Enter.
expand J:\i386\gpedit.ms_ C:\windows\system32\gpedit.msc
where J: is the CD Drive, and C: is the Windows Drive.
A window flashes in the screen. The file will be replaced.
Hidden files not shown
The show hidden files and folders may not work sometimes.If we selected Show hidden files and folders, and then apply the changes, that changes may disappear when we open the Folder Options again.
This happens may be due to some viruses.
-------------------------------------------------------------
You can clean the system using an effective Antivirus, and get back the normal situation.
-------------------------------------------------------------
If you want to show the hidden files before removing this virus, this method may work.
Steps:
1. Open Registry Editor ( Start > Run > regedit )
2. Get to this location:
HKEY_CURRENT_USER\Software\Microsoft\Windows\CurrentVersion\Explorer\Advanced
Now, in the right pane, double click open the entry name Hidden. Change its value to 1 and click OK.
Now close the registry editor, and look whether the hidden files are shown or not.
Know Full System Details.
Sometimes, we may need to know details of our computer. Here is method for that,
Method 1:
1. Start Command Prompt ( Start > Run > CMD )
2. Type Systeminfo and press Enter.
To save this details to a text file :
3. Type Systeminfo>C:\systeminfo.txt
This command will save a text file named systeminfo in C drive.
You can change the path for you use.
Method 2:
1. From the Start menu, select Run.Type msinfo32.exe and press Enter.
You will have everything listed there.
To know more,
From Start menu, select Help and Support.
Under Pick a Task ,select Use Tools to view your computer information and diagnose problems.
From the left pane, select Computer Information and select relevant category from the right pane.
Convert FAT32 to NTFS
----------------------------------------------------------------------------------
Hanging on FAT32 hard disk!!
Its time to change! The only need of FAT32 file system is for the use of DOS or Windows 98 to access your disk.
NTFS is more powerful with other superior features! (Windows Vista Need a NTFS Disk).
----------------------------------------------------------------------------------
You can convert FAT32 to NTFS without formatting the drive.
After converting to NTFS,you cannot convert back to fat32 without formating the drive.
----------------------------------------------------------------------------------
How to convert:
1. Close all applications.
2. From Start menu select Run and type cmd, press OK.
Comand Prompt appears.
3. Type as follows:
convert (drive letter): /fs:ntfs
For example:
To convert C to NTFS, type
convert c: /fs:ntfs and press Enter
Give Yes to all the questions asked by the computer.
You may need to restart the computer to convert drive c: as it is being used by windows.
When converting drive other than C: (windows drive) ,computer asks for the Current Label.
Type the name given to the respective drive letter (LOCAL DISK as default).
If you have renamed the drive to any other name..Give that name as Current Label.
System Restore: Enable/Disable
You can enable/disable System Restore by this method.
------------------------------------------------------------------------------------------------
Tip:System restore stores some viruses (files) deleted by the antivirus and hence has a risk of restoring Virus.So, when you have completed a system scan, Turn off and then Turn on the System Restore to delete that stored Viruses.
------------------------------------------------------------------------------------------------
How to do:
Right click on My Computer and select Properties.
Now, select the System Restore tab from the Properties window.
To turn off : Tick Turn off System Restore on all drives.
To turn on : Untick Turn off System Restore on all drives.

Use System Restore when Windows fails to start.
If you have enabled System Restore you can use it when you fails to boot into Windows.
How to do:
Restart your computer.
Press F8 before the Windows Logo displays. (Keep pressing F8 from the starting itself, if you hav'nt understood when)
Then the Windows Boot Menu displays.
Select Safemode With Command Prompt and hit Enter.
Windows loads to Command Prompt.
Then type the following:
%systemroot%\system32\restore\rstrui.exe and hit Enter.
That loads the System Restore window. Continue as usual restoration
Automatic Logon to Windows.
By following this method you can get automatically logged in into your system, even if other accounts exists.
Steps:
1. Select Run from Start menu.
2. Type control userpasswords2 , and press Enter.
User Accounts dialog box appears.
3. Select the user which is to be automatically logged in without prompting for password.
4. Uncheck the item Users must enter a user name and a password to use this computer.

5. Click Apply.
6. Enter the User Name and Password (If you have no password, leave password columns blank) of the account. Press OK.
Now restart your computer.
To remove auto login function:
1. Select Run from Start menu.
2. Type the following (or copy and paste)
rundll32 netplwiz.dll,ClearAutoLogon , and press Enter.
Now restart your computer to see the change.
Installing Windows Media Player 11
Below is the method to bypass the Windows Media Player 11 installation.
1. After you download the file wmp11-windowsxp-x86-enu.exe from any site, right click on it
and select Extract to wmp11-windowsxp-x86-enu .
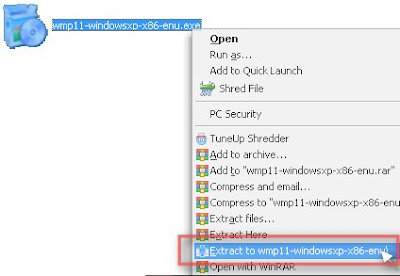
You may need to install Winrar to extract the files.Download it from here.
A folder wmp11-windowsxp-x86-enu is formed.
2. Now download the cracked dll file LegitLib.dll from here.
3. Paste that file in the folder wmp11-windowsxp-x86-enu.
Click Yes if asked for replace confirmation.
5. After that, run the file setup_wm.exe and continue as normal setup process.
1. After you download the file wmp11-windowsxp-x86-enu.exe from any site, right click on it
and select Extract to wmp11-windowsxp-x86-enu .

You may need to install Winrar to extract the files.Download it from here.
A folder wmp11-windowsxp-x86-enu is formed.
3. Paste that file in the folder wmp11-windowsxp-x86-enu.
Click Yes if asked for replace confirmation.
5. After that, run the file setup_wm.exe and continue as normal setup process.
Make Windows XP Genuine.
Make Windows XP Genuine.
You can easily make your pirated version of Windows XP Genuine.All you want to do is, change the Installation Key (Serial Number).
After downloading, open the Keyfinder application.
The application shows the CD Key that you have entered while installing Windows.
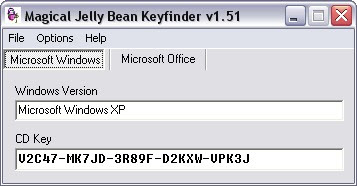
Now go to Options menu and select Change Windows Key.


Now enter this key in the provided box.
V2C47-MK7JD-3R89F-D2KXW-VPK3J
Then click Change.
Restart your system.
Now your copy of Windows XP is genuine.
----------------------------------------------
If your system has been found as Pirated by Windows and shows a tray message that Windows XP is not genuine, you can remove it also.
Start Task Manager. (Ctrl+Alt+Del) (Task Manager Disabled?)
Go to Process tab.End the process wgatray.exe.Restart Windows XP in Safe Mode.
Now delete the following files:
The file WgaTray.exe in c:\windowss\system32
The file WgaTray.exe in c:\windows\system32\dllcache
Start Windows Registry Editor (Start > Run > regedit)
Export the keys before you start to edit reistry. Show How To.
Locate this key
HKEY_LOCAL_MACHINE\SOFTWARE\Microsoft\ Windows NT\CurrentVersion\WinlogonNotify.
From there delete WGALOGON.
Now press Home button on keyboard.
Press Ctrl+F, type WgaTray and press Find.
Delete all references in your registry related to WgaTray
But be very careful while editing the registry
Autocheck Skipped at statup showing a message.
While starting the system if you get this error message
System Root/Windows/system 32/Autochk.exe Program not found SKIPPING AUTOCHECK
that means the Autochk.exe file is corrupted or missing.
Resolve:
1.Insert the Windows XP startup disk (the CD used for installing Windows XP), and then close the Welcome to Microsoft Windows XP window if it appears.(Dont mind if does'nt appear)
2.Click Start, click Run, type cmd, and then click OK.
3.At the command prompt window opened, type the following command, and then press ENTER.
copy G:\i386\autochk.exe %WINDIR%\system32
Note: The drive letter G: represents your CD drive,that is running the Windows XP startup disk.
4.Type Y when you receive the following message:
Overwrite C:\WINDOWS\system32\autochk.exe? (Yes/No/All):
5.Remove the Windows XP disk, and then restart the computer.
Folder Options Disabled
Due to some viruses or malicious softwares, Folder Options may disappear. You can get back it by this method.
Note: This method works only if the viruses are completely removed.
To get Folder Options:
1. From Start menu, select Run. Type gpedit.msc and press Enter.
General Policy window opens.
2. Get to this location:
User Configuration > Administrative Templates > Windows Components > Windows Explorer
Now, in the right pane double click open Removes the Folder Options item from the Tools menu.
Select Disabled and press OK.
Thats the work.
This may not solve your problem, if it was caused by Virus.
The following steps helps to remove the Virus too.
Recommended doing these steps in Safe mode.
The Virus is named as HEAP41a.
They creates a folder HEAP41a in the system drive for their functioning.
Removing this folder can remove the virus.
1. Open Notepad
2. Type the following text
rmdir C:\HEAP41a
where C:\ is your Windows drive.
3. Save that text file.
4. Change its extension from .txt to .bat
5. Double click open it.
A Dos windows now flashes.
The virus is removed.
6. Keep your Antivirus uptodate to get rid of such viruses.
Also Run this file:
1. Delete Autorun files in Drives.
Regedit disabled by Administrator
Sometimes, Registry Editor may be disabled by the Administrator. You can access Registry Editor by this method.
How to do:
1. Open General Policy ( Start > Run > gpedit.msc )
2. Get to this location:
User Configuration > Administrative Templates > System
3. Now, in the right pane, double click open Prevent access to registry editing tools.

4. Set Not configured or Disabled, and click OK.
That makes Registry Editor accessible.
Task Manager Disabled
Sometimes Task Manager may be disabled.It may be due to a virus, but may not be.
I
f Task Manager is still disabled after removing the viruses, you can use this method to get it enabled.
There are two methods: (Or download file from the bottom)
A. General Policy Method:
1. From Start menu select Run and type gpedit.msc and hit enter.
General Policy window opens.
2. Get to this location:
User Configuration > Administrative Templates > System > Ctrl+Alt+Del Options
3. In the right pane, double click open Remove Task Manager.
Select Disabled and press OK.
B. Registry Editor Method:
1. From the Start menu, select Run. (Window Key + R)
2. Copy and paste the following and hit Enter.
REG add HKCU\Software\Microsoft\Windows\CurrentVersion\Policies\System /v DisableTaskMgr /t REG_DWORD /d 0 /f
The Task Manager will be enabled.
Download files:
1. Task Manager-Enable/Disable files
Run Disabled in Start Menu
Sometimes you may not see the option Run in your start menu.This may be due to viruses or some newly installed softwares.You can get back Run in start menu.If you doesnt remove the virus (if it is so), Run may disappear each time you reboots.
To get Run:
 First method:
Right click on Start menu and selectProperties.
Then select Customize.
Now select Advanced tab.
Under Start Menu Items coulumn, tick Run Command.
Second method:
1. Open this file
C:\WINDOWS\system32\gpedit.msc (C=Windows drive).
General Policy window opens.
2. In the left pane, get to
User Configuration>Administrative Templates>Start Menu and Taskbar
3.Now, in the right pane double click open
Remove Run menu from Start menu, select Disabled and click OK
Thursday, September 11, 2008
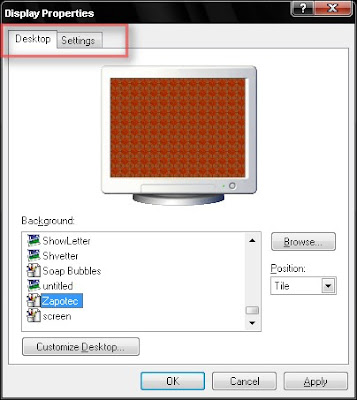
No Appearance, Themes and Screen Saver in Display Properties
Before doing these steps, make sure that you have completely removed all viruses, malwares etc. from your system.
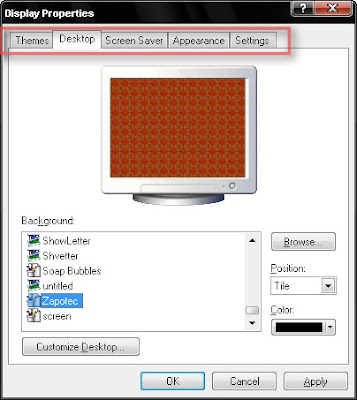
Sometimes, in Display Properties, there will be no Appearance and Themes or Screen Saver tabs.
Using this method, you can get it back.
Steps:
1. From the Start menu, select Run. Type gpedit.msc and hit Enter.
General Policy window opens.
2. Get to this location from the left tab:
User Configuration > Administrative Templates > Control Panel > Display
3. From the right tab double click open the following items and set Disabled.
Hide Appearance and Themes tab - for Appearance and themes tab.
Hide Screen Saver tab - for Screen Saver tab.
4. Close General Policy Window.
Sometimes, in Display Properties, there will be no Appearance and Themes or Screen Saver tabs.

Using this method, you can get it back.
Steps:
1. From the Start menu, select Run. Type gpedit.msc and hit Enter.
General Policy window opens.
2. Get to this location from the left tab:
User Configuration > Administrative Templates > Control Panel > Display
3. From the right tab double click open the following items and set Disabled.
Hide Appearance and Themes tab - for Appearance and themes tab.
Hide Screen Saver tab - for Screen Saver tab.

4. Close General Policy Window.
Subscribe to:
Posts (Atom)